Define: Compost or Mulch -
Unit Overview
This unit starts by addressing a common student misconception: that energy is released when bonds break. The first lab focuses on bonds breaking where students will discover that energy is actually required for bonds to break. Students are then provided with a microscopic view of the bonds breaking process so they can explain why energy is absorbed rather than released when bonds break. An exothermic synthesis reaction is demonstrated for students next so they understand that energy is released when bonds form. Students put the two concepts of bond breaking and bond forming together in order to explain overall chemical reactions as endothermic or exothermic. Calorimetry will be employed to measure the energy absorbed or released in a chemical reaction. Students will utilize a calorimetry simulation prior to completing the physical lab so they fully understand what is occurring on a microscopic scale throughout the process and why they are being asked to perform certain calculations to calculate energy.
The second half of the unit introduces students to covalent bonding, including single, double, and triple bonds so students begin to understand that all chemical bonds do not absorb or release the same amount of energy. Finally, students will utilize bond enthalpy tables to calculate the enthalpy of formation of a compound and then the enthalpy of complete chemical reactions.
Gapless Explanation of Anchoring Phenomenon
Spontaneous combustion of a compost pile is only possible if enough heat energy is released by the overall chemical reaction that is occurring within the pile. Organisms within the pile are breaking down the organic matter via cellular respiration. Glucose molecules in the presence of oxygen are combusted to form carbon dioxide and water. The overall reaction can be written as: C6H12O6 + 6 O2 → 6 CO2 + 6 H2O.
To determine the amount of energy released in this reaction, the overall chemical reaction needs to be broken down into steps. Chemical reactions can be thought of as requiring two steps: breaking existing bonds of reactants, then forming new bonds of products. Energy must be absorbed to break bonds, while energy is released when bonds are formed. The absorption of energy to break bonds results in a kinetic energy decrease of the surroundings as kinetic energy is transformed to potential energy within the system. The decrease in kinetic energy of the surroundings is equivalent to a decrease in temperature, this is referred to as endothermic. The opposite occurs when bonds are formed; potential energy of the system is transformed into kinetic energy and released to the surroundings resulting in a kinetic energy increase of the surroundings equivalent to a temperature increase. Bonds forming is exothermic. (When the temperature of the system goes down, to maintain equilibrium, energy is transferred from the surroundings back into the system. Conversely, when the temperature of the system increases, that energy will be released into the surroundings, again, to maintain equilibrium.) This explains the individual steps in a chemical reaction, but not how to determine if a reaction will release energy.
The amount of energy absorbed or released in a chemical reaction can be measured experimentally using calorimetry. In calorimetry, the heat exchanged between the reaction (defined as the system) and the surroundings can be calculated based on measuring the temperature change of the surroundings. For many aqueous reactions, a simple coffee-cup calorimeter may be employed. The calorimeter is two nested Styrofoam cups to provide insulation from the laboratory environment. The chemical reaction will be set up to occur in a specifically measured quantity of solution (the surroundings) so that the mass of the solution is known. During the reaction, the heat evolved or absorbed causes a temperature change in the solution which is measured using a temperature probe. If we know the specific heat of the solution (assumed to be that of water), then the heat absorbed by or lost from the solution (qsolution) can be calculated using the following equation:
qsolution = msolution • Cs solution • ∆T
Energy absorbed or released in a chemical reaction can also be determined by the number and type of bonds broken and formed. Qualitatively, we can look at the number of bonds broken in a chemical reaction versus the number of bonds formed. If more bonds are broken than formed, the overall reaction should be endothermic. If more bonds are formed than broken, the reaction should be exothermic. Though this is usually true, for some reactions, the number of bonds broken and formed is equal. These reactions can still be classified as endothermic or exothermic by quantitative means. The eight lessons in this unit end here.
The overall energy unit continues to quantify bond energy. Students will develop a knowledge of single, double, and triple covalent bonds. A working knowledge of valence electrons of main group elements on the periodic table is needed in order to apply that knowledge again here to determine how many valence electrons a compound has and then to determine how many of those electrons will be shared between each atom in the compound. A simple formula can be employed that uses total valence electrons and electrons needed according to the octet rule to determine how many electrons are shared in a given covalent formula. This formula will help determine if and when double or triple covalent bonds are present in a molecule.
The energy absorbed when bonds are broken is subtracted from the energy released when bonds are made. The overall net energy then identifies that reaction as endothermic or exothermic. A positive net energy is energy absorbed into the system, an endothermic reaction, while a negative net energy is energy released from the system which is an exothermic reaction. Though this subtraction method seems simple enough, what is not possible is to stop a reaction mid-way through after bonds are broken and before new ones are formed to measure energy gained or lost in the system. A table of individual bonds energies becomes necessary. Bond energy is the average energy needed to break or form a bond. If every bond in a compound can be identified, then the energy necessary to either break or make the sum of the bonds can be calculated.
Bond energy is the energy needed to break a bond. If the type of bond present and the two atoms that the bond is between is known then a table of bond energies (*values provided in bond energy tables are averages taken over a variety of compounds that contain a specific atom pair, these values tend to vary slightly from one bond energy table to another) can be used to determine the overall bond enthalpy of a reaction. For the combustion of glucose, the following bond energies are needed to determine the enthalpy for the reaction. These bond energies may vary slightly if acquired from a different table.
C–H = 413 kJ/mol
C–O = 358 kJ/mol
O–H = 467 kJ/mol
O=O = 495 kJ/mol
C=O = 799 kJ/mol
Glucose contains 5 C–C, 7 C–H; 5 C–O, 5 O–H bonds, and 1 C=O bond. The 6 O2 molecules contain 6 O=O bonds. The products contain 12 C=O and 12 O–H bonds.
[(5 * 347) + (7 * 413) + (5 * 358) + (5 * 467) + (1 * 799) + (6 * 495)] – [(12 * 799) + (12 * 467)] =
(1735 + 2891 + 1790 + 2335+ 799 + 2970) – (9588 + 5604) =
12520 – 15192 = –2672 kJ/mol
Standards
Next Generation Science Standards
- Physical Science
- [HS-PS1-4] Develop a model to illustrate that the release or absorption of energy from a chemical reaction system depends upon the changes in total bond energy.
- [HS-PS3-2] Develop and use models to illustrate that energy at the macroscopic scale can be accounted for as a combination of energy associated with the motions of particles (objects) and energy associated with the relative positions of particles (objects)
Computational Thinking in STEM
- Data Practices
- Collecting Data
- Creating Data
- Manipulating Data
- Visualizing Data
- Analyzing Data
- Modeling and Simulation Practices
- Assessing Computational Models
- Using Computational Models to Understand a Concept
- Systems Thinking Practices
- Communicating Information about a System
- Investigating a Complex System as a Whole
- Thinking in Levels
- Understanding the Relationships within a System
Underlying Lessons
- Lesson 1. Lesson 1: Phenomenon Introduction
- Lesson 2. Lesson 2: Breaking Ionic Bonds Lab Activity
- Lesson 3. Lesson 3: Energy Transfer When Bonds Break
- Lesson 4. Lesson 4: Modeling Bond Formation
- Lesson 5. Lesson 5: Measuring Energy Transferred
- Lesson 6. Lesson 6: Calorimetry Lab
- Lesson 7. Lesson 7: Making and Breaking Bonds
- Lesson 8. Lesson 8: Modeling A Chemical Reaction
Lesson 1 Overview
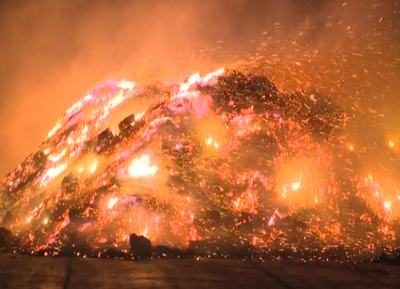
Students are introduced to the phenomenon. They will view two separate videos of mulch or compost piles spontaneously combusting.
They will be asked to think about decomposition, what is occurring on the microscopic level, and where the energy comes from.
Lesson 1 Activities
- 1.1. Is it possible for a compost pile to spontaneously combust?
- 1.2. What variables contribute to spontaneous combustion occurring?
- 1.3. What is decomposition?
- 1.4. The Microscopic Level and Energy
1.0. Student Directions and Resources
What is compost, and is it possible for a compost pile to spontaneously combust?
1.1. Is it possible for a compost pile to spontaneously combust?
Before answering this initial question, define the following terms below:
Question 1.1.1
Question 1.1.2
Define: Spontaneous Combustion -
1.2. What variables contribute to spontaneous combustion occurring?
Question 1.2.1
Describe the claim that was made in the first video. Then list variables that will contribute to spontaneous combustion occurring in a mulch or compost pile.
1.3. What is decomposition?
The process of decomposing was mentioned in the last video.
Question 1.3.1
Describe what you believe is happening when something "decomposes".
Question 1.3.2
What kind of creatures are typically involved with decomposition?
1.4. The Microscopic Level and Energy
We've looked at variables that could lead to spontaneous combustion and discussed decomposition, but what is occurring on the microscopic level?
Question 1.4.1
Describe what you believe is happening on a microscopic level to cause compost to spontaneously combust.
Question 1.4.2
Where is the energy coming from to cause the fire? (Hint: think about what is occurring with the chemical bonds on a microscopic level.)
Lesson 2 Overview
Students will dissolve five different ionic compounds in water to observe and measure the temperature difference before and after dissolving. Only endothermically dissolving ionic compounds are utilized here as the intention is for students to associate a compound’s bonds breaking with a temperature decrease as energy is required to break bonds. Kinetic energy from the water (the surroundings) is transferred to break bonds in the chemical system.
Students will use a spreadsheet in CODAP to systematically convert between various units. They will also observe how changing variables such as the amount of ionic compound used or the amount of water the ionic compound is dissolved in affects the temperature change.
Lesson 2 Activities
- 2.1. Investigation Part 1
- 2.2. Data Visualization
- 2.3. Automating Calculations Using CODAP
- 2.4. Investigation Part 2.A
- 2.5. Investigation Part 2.B
- 2.6. Analysis Questions
2.0. Student Directions and Resources
You will observe and record the temperature change when dissolving an ionic compound in water. Recall that an ionic compound is composed of cations and anions in specific proportions to create a neutral ionic compound.
You will need the following resources to complete this assignment.
2.1. Investigation Part 1
-
Record which ionic compound you are using in the table below.
-
Use a weighing boat to measure 1 gram of the ionic compound.
-
Use a graduated cylinder to measure 5 mL of water.
-
Record the initial temperature of the water.
-
In a small beaker, combine the water and ionic compound.
-
Place the temperature probe into the beaker and observe. Record the greatest difference in temperature from the starting temperature of the water/ionic compound mixture.
-
Dispose of water/ionic compound mixture in a sink and rinse out the beaker.
-
Repeat steps 1-7 with a total of five different ionic compounds.
Question 2.1.1
Record all data from Investigation Part 1 in the data table below.
2.2. Data Visualization
In order to rank the five ionic compounds according to the temperature change in 5 mL of water, we will use an online data analysis platform called CODAP. Below, you will see a CODAP workbench. CODAP will allow us to visualize our data immediately upon entering it into the platform.
Let's begin with familiarizing ourselves with the CODAP environment:
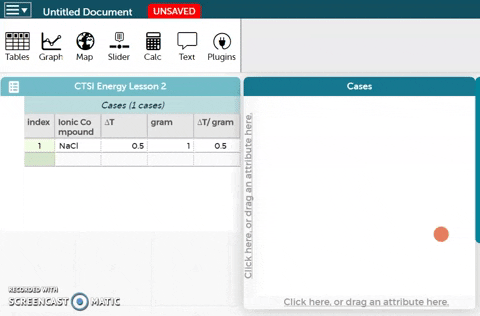 The platform is below these instructions. Notice an example ionic compound (NaCl) has been entered for you. Enter your data for the five ionic compounds you tested below this example.
- To better visualize the data, we can make a graph. In order to create a graph, drag the Ionic Compound variable to the x-axis of the plot as shown in the GIF on the right.
- Drag the ∆T/gram variable to the y-axis of the plot as shown in the GIF on the right.
- Observe the resulting plot. Then answer the questions below the CODAP workbench.
Question 2.2.1
Rank the five ionic compounds according to the temperature change in 5 mL of water from greatest to least in the table below by expressing the value as ∆T/gram.
Question 2.2.2
Predict how your ionic compound rankings will look if we convert all temperature change data from ∆T/gram to ∆T/mole.
2.3. Automating Calculations Using CODAP
In order to convert our data from ∆T/gram to ∆T/mole, we need to find the molar mass of each compound. Then we can convert each ionic compound's mass from grams to moles. Finally, we would need to take our calculated temperature change and divide that by our moles, but that is so much work. What if we could make CODAP do some of that for us?
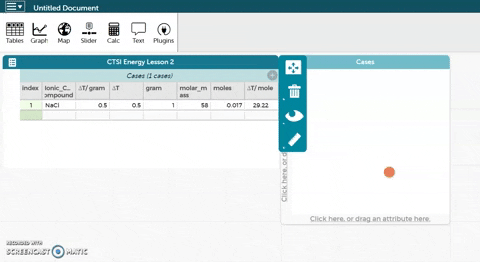 As before, the platform is below these instructions. The sodium chloride example has been expanded to include molar mass, moles, and ∆T/mole.
- Calculate the molar mass for each ionic compound and enter it in the platform below.
- CODAP can now calculate moles for you if you provide it with the correct formula. Hold the cursor over moles as seen in the gif at right and click on Edit Formula. Use the asterisk (*) for multiplication and the slash (/) for division.
- Click Apply to close the formula editor. You should see values appear in the moles column.
- Now follow the same procedure to calculate values for the ∆T/mole column. Again to better visualize the data, we can make a graph.
- Drag the Ionic Compound variable to the x-axis of the plot.
- Drag the ∆T/mole variable to the y-axis of the plot.
- Observe the resulting plot. Then answer the questions below the CODAP workbench.
Question 2.3.1
How did converting the mass of the ionic compounds from grams to moles affect your ranking of the ionic compound's temperature changes? Describe specific changes for individual ionic compounds observed in the graphs in your answer.
Question 2.3.2
Why do you believe the changes you observed from the first graph to the second graph above occurred? Again be specific in your answer here.
Question 2.3.3
Why is it important to look at mole quantities of chemical substances?
2.4. Investigation Part 2.A
Last unit we explored how the amount of reactant will affect the amount of product produced. We want to expand upon this knowledge and explore how the amount of reactant affects other factors in chemical reaction. Read through the protocol below and determine which ionic compound you will use and the amounts of that compound you will use for each trial before starting your investigation.
Protocol Investigation 2.A – Vary the amount of ionic compound
- You will need to choose one ionic compound to test, from the ionic compounds tested in Investigation Part 1.
- You will need to vary the amount of ionic compound, staying within the 1-3 gram range.
- You will need to keep the amount of water constant, at 5 mL.
- You will need to record the initial temperature of each individually as well as the greatest difference in temperature from the starting temperature of the water/ionic compound mixture.
- Complete three trials.
Question 2.4.1
Record data from Investigation 2.A below.
Question 2.4.2
Describe how increasing the amount of the ionic compound affected your recorded temperature change.
Question 2.4.3
Why was it important to keep water at 5mL for Investigation 2.A?
2.5. Investigation Part 2.B
Use the same ionic compound from Investigation 2.A for Investigation 2.B. Read through the protocol below and determine the amounts of water you will use for each trial before starting your investigation.
Protocol Investigation 2.B – Vary the amount of water
- You will need to use the same ionic compound used in the first part of Investigation 2.
- You will need to vary the amount of water, staying within the 2-10 mL range.
- You will need to keep the amount of ionic compound constant, at 1 gram.
- You will need to record the initial temperature of each individually as well as the greatest difference in temperature from the starting temperature of the water/ionic compound mixture.
- Complete three trials.
Question 2.5.1
Record data from Investigation 2.B below.
Question 2.5.2
Describe how increasing the amount of water affected your recorded temperature change.
2.6. Analysis Questions
Question 2.6.1
Ionic bonds were broken when the solids were placed in water, was the temperature change that resulted expected or not? Why?
Question 2.6.2
Are these reactions exothermic or endothermic? Why?
Lesson 3 Overview
In this lesson, students will utilize a simulation that shows the dissolving of an ionic compound in water. Water molecules must collide with the ionic compound in the proper orientation and with enough kinetic energy for the ionic compound to separate into constituent cations and anions.
The activity will force students to equate the reduction in the temperature of the water with the breaking of the ionic bond. The kinetic energy of the water is transferred to break the ionic bonds. This is an endothermic process. Students will only be able to recognize this when they view the simulation with a smaller number of water molecules present (~10).
After students develop the understanding that breaking bonds is an endothermic process, they will be asked to model bonds breaking by showing the changes in KE and PE of the system (ionic compound) and the surroundings (water).
Lesson 3 Activities
- 3.1. Temperature Changes of Ionic Compounds Dissolved in Water
- 3.2. Exploring the Simulation
- 3.3. Behavior of the Overall System
- 3.4. Behavior of Individual Molecules
- 3.5. Reviewing the Simulation
3.0. Student Directions and Resources
In this lesson, we will focus on the transfer of energy that occurs when bonds are broken. In the previous lesson, you added several different solid ionic compounds to water. When ionic compounds are added to water, ionic bonds are broken due to the attraction of the cations and anions that make up ionic compounds to the partially charged sides of water molecules.
You will need the following resources to complete this assignment.
3.1. Temperature Changes of Ionic Compounds Dissolved in Water
Let's review what occurred in lesson 2 by looking at Temperature vs Time graphs for three of the ionic compounds we tested.
KCl: 
NH4Cl: 
NaNO3: 
Question 3.1.1
Use the graphs above to identify temperature changes from the three representative ionic compounds shown. Recall we also tested these same ionic compounds last class.
Question 3.1.2
Describe the temperature change that occurred with the ionic compounds tested.
3.2. Exploring the Simulation
Observe the simulation by hitting "setup" and then “go/stop”. After you feel you have learned all the features of the simulation move on to answer questions 2.1 and 2.2 below.
Question 3.2.1
What temperature scale (Celsius, Fahrenheit, Kelvin) is represented on the graph? Explain how you know this.
Question 3.2.2
What state of matter are the water molecules in the simulation? Explain how you know this.
3.3. Behavior of the Overall System
The simulation you were working with models dissolving KI in water. You have control over the exact number of water molecules represented in the “beaker”. You will begin by looking at the overall bulk system.
Directions:
- Adjust the slider bar to the maximum number of water molecules possible. Then press "setup". Press "go" and observe the water molecules moving around the beaker in liquid form.
- Now press “add KI” and observe what happens to the ionic compound and the temperature of the beaker.
- Allow the simulation to run until all KI is split into K+ cations and I− anions.
- You may repeat the procedure as needed to answer the questions below.
Question 3.3.1
Calculate the change in temperature of the system by recording the initial and final temperatures of the system below. (Hover your cursor over the graph to obtain exact initial and final temperatures.)
Question 3.3.2
What action in the simulation corresponds to the specific temperature drops shown on your graph? If you are not able to determine this, reduce the number of water molecules until you are able to observe how the molecular motion of both the water molecules and the ionic compound corresponds to the temperature drop.
3.4. Behavior of Individual Molecules
Now you will use the same simulation, but this time you will be observing individual molecules.
Directions:
- Adjust the slider bar to 10 water molecules. Then press "setup" and "go".
- Now press “add KI” and allow the simulation to run until all KI is split into K+ cations and I− anions.
- You may repeat the procedure as needed to answer the questions below.
Question 3.4.1
What must occur for an ionic bond to break and KI to separate?
Question 3.4.2
It takes the KI noticeably longer to separate into separate cations and anions here. Describe why this is so.
Question 3.4.3
Calculate the ∆T of the system by recording the initial and final temperatures of the system below. (Hover your cursor over the graph to obtain exact initial and final temperatures.)
Question 3.4.4
Compare your answer to Question 4.3 to your answer for Question 3.1 (referenced again at the top of this page); are the temperature differences identical? Why or why not?
Question 3.4.5
Start the simulation over and press “watch an H2O molecule”. Wait for that molecule to collide with KI. What observation can you make about the relative speed of a water molecule before and after it collides with KI?
Question 3.4.6
Explain why you think the change in relative speed of a water molecule occurs. Where does the energy go?
Question 3.4.7
Based on your observations of the simulation, make a claim of what molecular interaction could cause the kinetic energy of the water molecules to increase (other than simply adding heat to the beaker via a hotplate or flame).
3.5. Reviewing the Simulation
A GIF of the simulation you have been working with is shown below. Observe that a water molecule slows down and seems to lose kinetic energy when it collides with the ionic compound KI. This collision causes the ionic compound KI to split into a K+ cation and an I− anion.

Where does the kinetic energy of the water molecule go? We will explore this question further in your homework and again in the next lesson.
Lesson 4 Overview
A synthesis reaction: Zn + I2 → ZnI2 will be demonstrated for the class using varying amounts of the reactants (all in correct molar ratios) so students can observe that bond formation is exothermic, and that more reactants used leads to a greater temperature increase.
Students will compare and contrast bond breaking and bond making and be provided with definitions for endothermic and exothermic. They will then model bond formation with their table groups including the PE/KE of the system/surroundings before and after.
Lesson 4 Activities
- 4.1. Bond Breaking and Energy Transfer
- 4.2. Endothermic or Exothermic
- 4.3. Synthesis Reaction Demonstration
- 4.4. Modeling the Trials
4.0. Student Directions and Resources
In this lesson, we will observe a reaction where bonds are formed called a synthesis reaction. We will again focus on the transfer of energy that occurs by modeling the process of bond formation.
4.1. Bond Breaking and Energy Transfer
Before we observe a synthesis reaction, let's review the transfer of energy that occurred in lesson 3 when an ionic compound split apart in water.
In that simulation we saw that a water molecule slowed down and seemed to lose kinetic energy when it collided with the ionic compound KI. This collision caused the ionic compound KI to split into a K+ cation and an I− anion.
If we put together two concepts from the homework and lesson 3, we can come to a conclusion about where the kinetic energy from the water went.
- Potential energy can be converted to kinetic energy, and kinetic energy can be converted back to potential energy.
- Energy can be transferred from the system to the surroundings, or from the surroundings into the system.
Recall that the water temperature at the beginning of our simulation experiment contained a certain amount of kinetic energy. That kinetic energy decreased the moment the water collided with the ionic compound and it subsequently broke apart. That kinetic energy must have transferred into the system.
Question 4.1.1
If the water's kinetic energy transferred into the system, why doesn't the temperature of the ionic compound of the now separate cations and anions increase?
4.2. Endothermic or Exothermic
In Lesson 2: Breaking Ionic Bonds Lab Activity, we recorded the temperature of water as different ionic solids were added to the beaker. We observed a temperature decrease for each of the five ionic solids.
The ionic bonds of ionic solids (the system) are broken when placed in water (the surroundings) causing a decrease in the overall temperature of the water. The decrease in temperature is is due to the transfer of kinetic energy from the surroundings to the system in order to break the bonds of the ionic compound. Temperature decreasing when bonds are broken is an endothermic process.
Definitions:
Endothermic - An endothermic process absorbs energy from its surroundings, usually in the form of heat.
Exothermic - An exothermic process releases energy from the system to its surroundings, usually in the form of heat.
Question 4.2.1
If breaking bonds is endothermic, describe a process that is likely exothermic. Record your initial thoughts below before discussing with your table group and the class.
4.3. Synthesis Reaction Demonstration
Your instructor will conduct an experiment using solid zinc and solid iodine to yield solid zinc iodide as shown in the chemical equation below. This type of reaction is known as a synthesis reaction because bonds are only being formed in the reaction, no bonds are broken.
Zn (s) + I2 (s) → ZnI2 (s)
- Zinc and iodine will be combined in a 1:1 molar ratio as indicated in the balanced equation above. Corresponding gram amounts are shown in the table below.
- After weighing out appropriate amounts of zinc and iodine, the two solids will be ground together using a mortar and pestle (your instructor will demonstrate).
- The contents will then be transferred to a test tube mounted to a ring stand inside the fume hood.
- A surface temperature probe will then be adhered to the bottom of the test tube to record the initial temperature before any reaction occurs.
- Exactly 1 mL of distilled water will be dispensed into the pulverized mixture of zinc (s) and iodine (s).
- The greatest difference in temperature from the starting temperature (of the surroundings) must be recorded so the overall temperature change can be calculated.
Question 4.3.1
Record the temperature changes of the chemical reaction below.
Question 4.3.2
Which trial resulted in the greatest temperature change?
Trial 1
Trial 2
Trial 3
Trial 2
Trial 3
Question 4.3.3
Explain why you believe your answer to question 3.2 caused the greatest temperature change.
4.4. Modeling the Trials
Consider the following as you model the interaction occurring in trials 1 and 3 below:
- The drawing space is meant to represent a zoom-in of the test tube, so there is no need to illustrate the test tube itself in your model. Only illustrate the contents inside the test tube.
- Temperature that was measured was of the surroundings, not of the system itself.
- Temperature correlates directly with kinetic energy. If temperature increases, kinetic energy should also increase.
- Follow the law of conservation of energy: the total number of energy boxes (potential energy + kinetic energy) filled in the before portion of your model must match the total number of energy boxes filled in the after portion.
Question 4.4.1
Model the interaction occurring in trial 1 with a minimum of two zinc particles and two iodine molecules below. In order to complete the model below, consider zinc and iodine to be the system and the test tube and surrounding air to be the surroundings.
Note: Draw your sketch in the sketchpad below

Question 4.4.2
Now model the interaction occurring in trial 3. Remember trial 3 is exactly double the quantities in trial 1. Again, consider zinc and iodine to be the system and the test tube and surrounding air to be the surroundings.
Note: Draw your sketch in the sketchpad below

Question 4.4.3
Trial 3 is double the quantity of reactants that were used in trial 1. List every difference in your models that expresses this quantity difference.
Lesson 5 Overview
Students will be introduced to calorimetry via a simulation. The simulation will guide them through choosing an appropriate material for the calorimeter in order to prevent heat loss to the environment and will also show students what occurs on a microscopic level inside the calorimeter itself.
After students understand the heat that is transferred inside the calorimeter, they will be shown how to calculate the heat absorbed by or transferred from the water in the calorimeter using the formula:
qsolution = msolution • Cs solution • ∆T
Lesson 5 Activities
- 5.1. An Introduction to Calorimetry
- 5.2. Exploring the Simulation
- 5.3. Change in Enthalpy (∆H)
- 5.4. Determine Endothermic or Exothermic through Change in Enthalpy (∆H)
- 5.5. Experimenting With Container Materials
- 5.6. The Ideal Material for a Calorimeter
5.0. Student Directions and Resources
So far in this unit, we have learned that energy is required to break bonds and that energy is released when bonds are made, but how much energy? How can we actually measure the energy transferred in one or both of these processes?
5.1. An Introduction to Calorimetry
Because the energy transfer involved in both breaking and making bonds involves heat, or thermal energy, we can employ a method called calorimetry to measure the heat transfer. Calorimetry is the science of measuring heat. In aqueous solutions, the energy is transferred to or taken away from the water, therefore, the thermal energy transferred may be calculated using the change in temperature of the water itself.
A calorimeter can be used to measure the amount of thermal energy transferred when bonds are broken or formed. A calorimeter will consist of a container with a cover, and a thermometer or temperature probe. The ideal calorimeter (for our purposes) must prevent the transfer of thermal energy between the calorimeter's container and its environment. This allows for an accurate determination of the thermal energy that has either been transferred to or from the water within the calorimeter.
Question 5.1.1
Describe how you expect the temperature in a calorimeter to change when an exothermic reaction occurs inside the vessel.
Question 5.1.2
How might the temperature change measured in question 1.1 be affected if thermal energy is lost from the calorimeter itself? Be specific and indicate if the temperature change measured would be greater or less than the one measured where no thermal energy is lost.
Question 5.1.3
How would the temperature change measured in an endothermic reaction be affected if thermal energy is lost from the calorimeter itself? Again, be specific and indicate if the temperature change measured would be greater or less than the one measured where no thermal energy is lost.
5.2. Exploring the Simulation
Experiment with the simulation by observing two different chemical processes.
- The separation of the ionic compound potassium iodide (KI) in water:
KI (s) → K+ (aq) + I− (aq)
- The synthesis of calcium hydroxide, Ca(OH)2 , and subsequent production of hydrogen gas when solid calcium metal (Ca) is added to water:
Ca(s) + 2 H2O (l)→ Ca(OH)2 (aq) + H2 (g)
Begin by hitting "setup” and then “run/pause”. In order to monitor the temperature of your experiment you will need a sensor in the container. Press “place sensor” in order to add a sensor inside your container with your cursor.
In order to observe the ionic compound separate in water, you will need to press the "Add KI" button; to observe the synthesis of calcium hydroxide and production of hydrogen gas, you will need to press the "Add Ca" button.
Question 5.2.1
The radius of a sensor is adjustable. What is the optimum size of a sensor to get the most accurate reading of the inside of the container? State your answer and explain the reason for your choice of size.
Question 5.2.2
Identify the separation of the ionic compound potassium iodide (KI) in water as endothermic or exothermic. Cite your observed temperature change in the graph and particle speed in the simulation as evidence for your choice.
Question 5.2.3
Is the synthesis of calcium hydroxide, Ca(OH)2 , and subsequent production of hydrogen gas when solid calcium metal (Ca) is added to water endothermic or exothermic? Cite your observed temperature change in the graph and particle speed in the simulation as evidence for your choice.
5.3. Change in Enthalpy (∆H)
Within this unit, we have observed changes in thermal energy by observing changes in temperature within a closed system. We saw this in a temperature decrease with ionic solids dissolving in water in lessons 2 and 3. We also saw this with a temperature increase through the synthesis of an ionic compound in lesson 4.
The thermal energy transferred when bonds are broken or formed is referred to as the enthalpy change (∆H). For our purposes, energy transfer will always occur within a closed system.
Because any energy transfer discussed in this class will occur within a closed system, the following relationship will be true for these energy transfers:
Enthalpy change = heat energy
∆H = q
In other words, as long as the energy is transferred within a closed system the enthalpy change (∆H) will be equal to the heat energy (q) that is transferred:
q = m c ∆T
∆H = m c ∆T
where:
q = heat energy in joules (J), so ∆H = energy transferred in joules (J)
m = mass of sample in grams (g)
c = specific heat (J/gOC)
ΔT = change in temperature (final temperature - initial temperature)
Specific heat, (c), is an intensive physical property that has a different, characteristic value for every substance. For example, the specific heat for water is 4.18 J/gOC. This would mean that it will take 4.18 joules of energy to raise the temperature of 1 gram of water 1OC.
5.4. Determine Endothermic or Exothermic through Change in Enthalpy (∆H)
Change in enthalpy is always relative to the energy within a system. If the system gains energy, change in enthalpy (∆H) will be positive. If the system loses energy, the change in enthalpy (∆H) will be negative.
In lessons 2 and 3, we observed the dissolving of an ionic compound in water. A decrease in temperature of the surroundings was observed, and this was labeled as endothermic. In an endothermic reaction, the change in enthalpy (∆H) equals the energy in joules absorbed by the system from the surroundings. Because energy is absorbed into the system, ∆H is positive.

In lesson 4, we observed the synthesis of an ionic compound. An increase in temperature of the surrounding was observed, and this reaction was labeled as exothermic. In an exothermic reaction, the change in enthalpy (∆H) equals the energy in joules released by the system to the surroundings. Because energy is released into the surroundings, ∆H is negative.
Question 5.4.1
Explain why an increase in water temperature should result in a negative enthalpy change. Be sure to use the terms system and surroundings in your answer.
Question 5.4.2
Explain why a decrease in water temperature should result in a positive enthalpy change. Be sure to use the terms system and surroundings in your answer.
5.5. Experimenting With Container Materials
The simulation you were working with on page 2 models a calorimeter. The simulation allows you to choose the material to use for your calorimeter using the dropdown menu labeled "container-material".
Begin by hitting "setup” and then “run/pause”. Adjust the "sensor-radius" slider bar to 48, then press “place sensor” to add this to the inside of the container ensuring the sensor does not contact to walls of the container. Now adjust the "sensor-radius" slider bar to 4, then press “place sensor” to add this to the outside of the container, again ensuring the sensor does not contact to walls of the container.
You will choose one of the chemical processes available (either the separation of the ionic compound potassium iodide (KI) in water or the synthesis of calcium hydroxide, Ca(OH)2 , and subsequent production of hydrogen gas when solid calcium metal (Ca) is added to water) to determine the ideal material to use for your calorimeter. In order to observe the ionic compound separate in water, you will need to press the "Add KI" button; to observe the synthesis of calcium hydroxide and production of hydrogen gas, you will need to press the "Add Ca" button.
Question 5.5.1
Why is it necessary to place a sensor outside of the container in addition to the one already inside of the container?
Question 5.5.2
Run your first experiment using aluminum as your container material after placing sensors as described in the directions above. After adding KI or Ca (this is your choice, but you must keep this constant throughout the rest of your experiments on this page) allow the simulation to run for a minimum of 1000 ticks, then complete the data table below.
Question 5.5.3
Run your next experiment using glass as your container material (there is no need to replace the sensors). Choose glass in the dropdown menu, hit the "setup" button, then the "run/pause" button. After adding KI or Ca (whatever you added your last experiment) allow the simulation to run for a minimum of 1000 ticks, then complete the data table below.
Question 5.5.4
Run your final experiment using Styrofoam as your container material. Choose Styrofoam in the dropdown menu, hit the "setup" button, then the "run/pause" button. After adding KI or Ca (whatever you added your last experiment) allow the simulation to run for a minimum of 1000 ticks, then complete the data table below.
5.6. The Ideal Material for a Calorimeter
Now that you have experimented using several different container materials, you will determine which material is best suited for a calorimeter.
On page 1 of this lesson, it was stated that the ideal calorimeter must prevent the transfer of thermal energy between the calorimeter's container and its environment in order to allow for an accurate determination of the thermal energy transferred.
The data you acquired for aluminum, glass, and Styrofoam is shown below.
Question 5.6.1
Of the container materials you tested, which material will make the best calorimeter? Explain your answer and cite your data as evidence for your choice.
Lesson 6 Overview
Students will utilize a calorimeter to measure the energy released in the following exothermic reaction:
Ca (s) + 2 H2O (l) → Ca(OH)2 (aq) + H2 (g)
The chemical reaction occurs when solid calcium metal is added to water, so the reaction can be set up to take place inside the calorimeter. Students will use three different quantities of calcium that they must test a minimum of three trials each. They will calculate the heat absorbed by the solution using the formula
qsolution = msolution • Cs solution • ∆T
msolution = mass of water + mass of calcium
Cs solution = specific heat of water
∆T = final temperature inside calorimeter – initial temperature inside calorimeter
The different quantities of calcium used will allow them to more accurately calculate the enthalpy of the reaction in kilojoules per mole.
This lab will require students write a formal lab report.
Lesson 6 Activities
- 6.1. Enthalpy of Reaction
- 6.2. Calorimetry Lab Design Part 1: Reactant Amounts
- 6.3. Calorimetry Lab Design Part 2: Procedure
- 6.4. Calorimetry Experiment 1
- 6.5. Calorimetry Experiment 2
- 6.6. Calorimetry Experiment 3
- 6.7. Enthalpy Calculations
6.0. Student Directions and Resources
In the last lesson you were introduced to calorimetry: an experimental method used to measure the transfer of heat within a closed system. You also learned that this transfer of heat is equal to the enthalpy change (∆H) which is the thermal energy transferred when bonds are broken or formed. You were able to explore how a calorimeter functions and determine the ideal material to use for your own calorimeter.
You will now use what you learned in the last lesson to design and execute your own calorimetry experiment.
You will need the following resources to complete this assignment.
6.1. Enthalpy of Reaction
Recall that overall chemical reactions can be categorized as endothermic or exothermic based on energy transferred into or out of the system. The chemical reaction is the system in this case.
Positive ΔH = energy moves into system from surrounding = endothermic
Negative ΔH = energy moves out system to surrounding = exothermic
When a chemical reaction occurs, there is a characteristic change in enthalpy. The enthalpy change for a reaction is based on the overall balanced equation and is expressed in kilojoules per mole. This can be calculated using the same equation used to calculate enthalpy (q = m c ∆T), then dividing by the number of moles of a substance utilized.
The enthalpy of an exothermic reaction is shown below:
2 H2 (g) + O2 (g) → 2 H2O (g) ΔH = -483.6 kJ/mol
This means that 483.6 kilojoules of energy are released for every two moles of hydrogen gas and one mole of oxygen gas that react to produce two moles of water vapor.
Question 6.1.1
Use the example exothermic reaction again shown here to answer the question below: 2 H2 (g) + O2 (g) → 2 H2O (g) ΔH = -483.6 kJ/mol
How much energy would be released in the chemical reaction: 4 H2 (g) + 2 O2 (g) → 4 H2O (g)
Question 6.1.2
Use the example exothermic reaction again shown here to answer the question below: 2 H2 (g) + O2 (g) → 2 H2O (g) ΔH = -483.6 kJ/mol
How much energy would be released in the chemical reaction: H2 (g) + ½ O2 (g) → H2O (g)
6.2. Calorimetry Lab Design Part 1: Reactant Amounts
The purpose of the lab is to measure the energy absorbed or released in a chemical reaction. You will utilize a calorimeter to measure the energy absorbed or released in the following chemical reaction:
Ca (s) + 2 H2O (l) → Ca(OH)2 (aq) + H2 (g)
In this reaction you have two reactants, calcium and water. The amount of calcium will be your independent variable. The amount of water will be a controlled variable, as you will keep it constant for all trials. Energy absorbed or released will be your dependent variable. Anything that is constant throughout your experiment is a controlled variable.
As you run your experiment, you will use three different amounts of calcium. You will run each trial three times, for a total of nine trials. The amount of water must be held constant throughout your experiment.
Question 6.2.1
Choose three different quantities of calcium in the range below and choose a set amount of water in the range below.
- Range for amounts of calcium: 0.10 – 0.50 grams
- Range for amount of water: 80.0 – 120.0 mL
Question 6.2.2
Calorimetry calculations will require that the quantity of water used be expressed as a mass rather than a volume. Your volume of water can be converted to a mass expressed in grams using the the density of water which is 1 g/mL. For example, if your volume of water is 50mL, that is equal to 50 g as 50g/50mL = 1 g/mL. Convert your volume of water to a mass in grams.
Question 6.2.3
Calorimetry calculations will also require the total mass of solution. Your solution is comprised of your solute (calcium) and your solvent (water). Thus, in order to calculate the mass of solution for each experiment you will add your mass of calcium to your mass of water for each experiment.
6.3. Calorimetry Lab Design Part 2: Procedure
Design an experiment to determine the enthalpy of reaction, ∆H°rxn, for the reaction of calcium metal with water by answering the questions below.
Question 6.3.1
Choose one of the following vessels in which you will conduct your calorimetry experiment.
250 mL glass beaker and Parafilm to cover
250 mL glass Erlenmeyer flask with a rubber stopper
Aluminum can with no lid
Styrofoam cups with plastic cover
250 mL glass Erlenmeyer flask with a rubber stopper
Aluminum can with no lid
Styrofoam cups with plastic cover
Question 6.3.2
Explain the reasoning behind your choice of vessel in question 3.1
Question 6.3.3
In addition to the vessel you chose in question 3.1, you will be provided with the following materials:
- Calcium
- Distilled water
- 100 mL graduated cylinder
- Temperature probe
- Digital balance
- Weighing Boats
Design a simple, repeatable procedure that you will follow for each of your three experiments below.
6.4. Calorimetry Experiment 1
Use the procedure you designed on pages 2-3 to complete three trials for your first decided upon amount of calcium to test.
Question 6.4.1
Fill in the data table below as you complete your three trials for experiment 1.
Question 6.4.2
Calculate averages for mass of calcium, mass of solution, and change in temperature below.
6.5. Calorimetry Experiment 2
Use the procedure you designed on page 2 to complete three trials for your second decided upon amount of calcium to test.
Question 6.5.1
Fill in the data table below as you complete your three trials for experiment 2.
Question 6.5.2
Calculate averages for mass of calcium, mass of solution, and change in temperature below.
6.6. Calorimetry Experiment 3
Use the procedure you designed on page 2 to complete three trials for your third decided upon amount of calcium to test.
Question 6.6.1
Fill in the data table below as you complete your three trials for experiment 3.
Question 6.6.2
Calculate averages for mass of calcium, mass of solution, and change in temperature below.
6.7. Enthalpy Calculations
Question 6.7.1
Fill in the data table below as you complete your experiment.
As the solution is composed primarily of water, the specific heat of the solution will simply be the specific heat of water:
*Cs solution = specific heat of water = 4.18 J/g•°C
Question 6.7.2
Classify the reaction as endothermic or exothermic using your enthalpy as evidence.
Question 6.7.3
Describe how thermal energy was transferred between the system and the surroundings. Include the terms "potential energy" and "kinetic energy" in your answer.
Question 6.7.4
Compare your calculated enthalpies for your three experiments. What kind of relationship exists between the amount of calcium utilized and the enthalpy?
Question 6.7.5
Compare your calculated enthalpies of reaction for your three experiments. What do you notice about these values?
Lesson 7 Overview
The following endothermic reaction is demonstrated for students:
Ba(OH)2 + 2 NH4Cl → BaCl2 + 2 NH3 + 2 H2O
They will easily identify it as endothermic as the temperature will drop rapidly after the solid reactants are mixed together. Students will answer some introductory questions about breaking and making bonds and what they believe occurred here.
Then students will use paper cut-outs of the atoms involved in the chemical reaction. This will allow them to indicate the initial bonds present in the reactants, to determine which bonds need to break to allow the rearrangement of atoms in the products, and finally what new bonds must be created to form the products. The goal is to determine if more bonds are broken or formed in the overall reaction, and to connect this with the entire reaction being endothermic or exothermic.
Lesson 7 Activities
- 7.1. The Chemical Reaction
- 7.2. Describing the Energy Transfer
- 7.3. Modeling the Reaction With Paper Cutouts
- 7.4. Determining Endothermic or Exothermic
- 7.5. What if the number of bonds broken and formed are identical?
7.0. Student Directions and Resources
Most chemical reactions involve both breaking and making bonds. Whether or not energy is absorbed or released in a chemical reaction can be understood by looking at the difference between the number of bonds broken versus the number of bonds formed.
You will need the following resources to complete this assignment.
7.1. The Chemical Reaction
Your instructor will demonstrate the following chemical reaction using 32 grams of solid barium hydroxide, Ba(OH)2, and 10 grams of solid ammonium chloride, NH4Cl:
Ba(OH)2 (s) + 2 NH4Cl (s) → 2 NH3 (g) + BaCl2 (s) + 2 H2O (l)
Question 7.1.1
Record the temperature data from the chemical reaction.
Question 7.1.2
Is this an endothermic or an exothermic reaction? How do you know?
7.2. Describing the Energy Transfer
In order to describe the energy transfer in the reaction, first we must define both the system and the surroundings in the reaction as demonstrated.
Question 7.2.1
Define the system for this reaction.
Question 7.2.2
Define the surroundings for this reaction.
Question 7.2.3
Using the terms system and surroundings, describe the movement of kinetic energy from the start of the reaction to the end of the reaction.
Question 7.2.4
Using the terms system and surroundings, describe the movement of potential energy from the start of the reaction to the end of the reaction.
7.3. Modeling the Reaction With Paper Cutouts
- Get a large whiteboard and whiteboard markers for your table group.
- Create the starting molecules with the paper elements given. You should use all the paper materials you have (no elements should be left over). Draw bonds between atoms on the whiteboard.
- Now, rearrange the molecules you have in order to create the products by breaking as few bonds as possible. Again, draw bonds between atoms on the whiteboard
- Once you have a solid grasp on which bonds are not broken during the process, you can tape the atoms that stay bonded throughout the reaction together.
Question 7.3.1
Once you determine which bonds remain throughout the entire equation and which do not, count the total number of bonds that break and record that below.
Question 7.3.2
Now determine the number of new bonds that are formed and record that number below.
Question 7.3.3
Compare the total number of bonds broken versus the total number of bonds formed. Discuss this with your table group and the class to determine how this connects to your answer for question 1.2
7.4. Determining Endothermic or Exothermic
Comparing the total number of bonds broken to those formed is the first step in helping us determine if a reaction is endothermic or exothermic. On the previous page, you were provided with atom cutouts to better enable you to determine where bonds are located in the reactants and which bonds must be broken to form the products.
Drawing atom models is another way to go about this same process. In the questions below, you will be asked to draw atom models for both the reactants and the products in each chemical reaction. Then you will count both the bonds present in the reactants that must be broken in order to form the products, and the number of new bonds that must be formed to create the products.
You will then use the difference in the number of bonds broken vs. formed to determine if the overall chemical reaction is likely endothermic or exothermic. More bonds broken than formed correlates with an endothermic reaction as more energy must be added to the system to break the bonds, while fewer bonds broken than formed correlates with an exothermic reaction. An exothermic reaction is one is which energy is being released from the system.
Question 7.4.1
Draw a complete atom model for the following reaction:
2NaHCO3 → Na2CO3 + H2O + CO2
Note: Draw your sketch in the sketchpad below
Question 7.4.2
Count the number of bonds broken in the reactants versus the new bonds formed in the products to determine if the reaction is endothermic or exothermic.
2NaHCO3 → Na2CO3 + H2O + CO2
Question 7.4.3
Draw a complete atom model for the following reaction:
2H2O2 → 2H2O + O2
Note: Draw your sketch in the sketchpad below
Question 7.4.4
Count the number of bonds broken in the reactants versus the new bonds formed in the products to determine if the reaction is endothermic or exothermic.
2H2O2 → 2H2O + O2
Question 7.4.5
Draw a complete atom model for the following reaction:
2Al + Fe2O3 → 2Fe + Al2O3
Note: Draw your sketch in the sketchpad below
Question 7.4.6
Count the number of bonds broken in the reactants versus the new bonds formed in the products to determine if the reaction is endothermic or exothermic.
2Al + Fe2O3 → 2Fe + Al2O3
7.5. What if the number of bonds broken and formed are identical?
As it turns out, all bonds are not created equal. Some bonds have more energy associated with them than others. A stronger, more energetic bond requires more energy to be broken, and releases more energy when it is formed. The end of the video below shows an example chemical reaction where two bonds are broken and two bonds are formed.
Lesson 8 Overview
Students will be guided through modeling a full chemical reaction by counting the number of bonds that must be broken versus the number of bonds formed in order to determine if the overall reaction is likely endothermic or exothermic. Individual bond breaking and bond making steps will be included in the model as well as the PE/KE of the system/surroundings throughout the reaction.
Lesson 8 Activities
- 8.1. Modeling A Chemical Reaction
8.0. Student Directions and Resources
The Law of Conservation of Energy states that energy is neither created nor destroyed in any chemical reaction. Thus, we can determine if a chemical reaction is endothermic or exothermic by quantifying both the amount of energy transferred from the surroundings into the system to break bonds, and the amount of energy released from the system back into the surroundings when bonds are formed.
You will need the following resources to complete this assignment.
8.1. Modeling A Chemical Reaction
Your instructor will begin by modeling an endothermic chemical reaction on the board for you using a set amount of energy (potential energy + kinetic energy) that will be traced from the surroundings into the system and back out again. The amount of energy absorbed or released will be based on the number of bonds that are broken versus the number of new bonds formed in the chemical reaction.
After your instructor models the endothermic reaction, you will model an exothermic reaction on your handout using the same principles and ideas demonstrated in your instructor's model on the board. Then you will practice modeling two more chemical reactions; you will need to determine if these reactions are endothermic or exothermic during the modeling process to ensure the correct amount of energy absorbed or transferred throughout the chemical reaction
